1.30.2011

Wood Block Puzzle

Blueberries, the only food my son won't throw on the ground

Goodnight Gorilla, the book I've been forced to read 4294 times

I saw this clever idea somewhere in the blogosphere and wanted to reproduce it ever since. I love that you get to tailor the images to the interests of your child, and that you get 6 separate puzzles for the price of one (but not for the work of one, mind you). I've done the blueberries and Goodnight Gorilla images so far (as pictured above), but afterward when I tried to piece them back together again, I realized I had inadvertently chosen some relatively challenging images. My son probably won't be able to complete them by himself for at least a few more years, but that's yet another beauty of this puzzle--it can grow with your child if you choose a range of easy to hard images!

Anyway, on to the tutorial:

Supplies
You will need:
  • Wood blocks (they come in a range of sizes--I used the 2" blocks, 4 rows, 4 columns)
  • 6 images
  • Glue
  • Scissors
  • Modge Podge
  • Brush
  • Pen or pencil (and maybe a ruler)
Steps:
  1. Decide on the size of your wood blocks, and then decide how many rows and columns you want for your puzzle (you can order them for cheap online but you have to buy in bulk; I bought mine a la carte at Michael's for $1.29 each)
  2. Once you determine the overall dimensions of your puzzle, select 6 images and cut them to the same dimensions. If you can find images in a magazine or calendar, great. If you need to print out the images, then use your computer program of choice to create images with the proper dimensions. 
  3. Now for the somewhat tedious part. You'll have to cut up your image so that each piece lays flush on a block. It can be frustrating because you will likely find that some of your wood blocks are not perfect squares, and not necessarily the exact same dimensions as one another (wood can tend to contract or expand depending on the humidity). I just dealt with this by tracing around each wood block directly onto the image, one by one, then cutting out that particular piece, and gluing it onto the wood block.
  4. Before gluing each piece though, you will likely have to trim it down before gluing because you do not want the image to hang over any of the edges of the wood block at all, and ideally it should rest just within each edge. That way, the Modge Podge, once applied, will seal the image fully onto the wood block and you won't have to worry about the image fraying or peeling somewhere down the line.
  5. After you're finished with the cutting/gluing process for all six sides, then apply Modge Podge to all six sides and you're done!

    1.28.2011

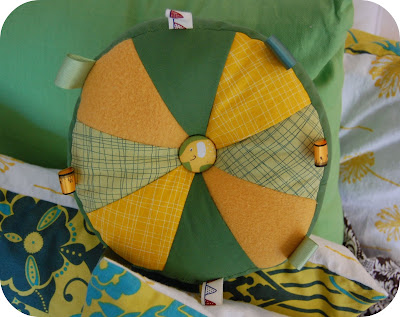
    Taggie Pillow


    I had so many random scraps of fabric and ribbon laying around that I decided to make a taggie pillow out of them for my son. He still loves him some tags so I figured he'd get a kick out of having so many in one place to choose from.  I just made it up as I went along so I unfortunately can't offer you a tutorial.  And some "design" elements were actually mistake coverups (like the cute elephant button which made its appearance because I didn't know how to make all the crisscrossing lines of the pie intersect at one neat point).

    I did remember to take one "before" picture that might a tiny bit instructive. If you're an experienced sewist, then you will need no tutorial, and would probably come up with a much better product with one arm tied behind your back.  If you are not (and I am not), you will still be able to figure it out with enough thought and the patience to redo if you mess up along the way. :) Or, you can just make a simple taggie blanket (there are a plethora of tutorials on the web for taggie blankets so I'm not about to reinvent the wheel).


    1.27.2011

    Fall Foliage Bookmarks


    During my five year stint on the east coast, I was so utterly taken by the fall. It was really the only reason I could tolerate the frigid winters and suffocating summers. I'd spend many October and November days walking through my neighborhood, or better yet, the Shenandoahs collecting the most perfect red, orange, and yellow leaves I could find. I would press and dry them and store them away in an airtight box, waiting until I had a good enough reason to use them. Well, years went by and my collection of dried leaves started to get out of control so I finally decided to make laminated bookmarks out of them for friends and family, particularly the ones in California who were yearly deprived of the spectacle of fall (or seasons for that matter). I think this is what I will do with all the leaves that my son loves to pick off the ground for me. 

    ::All you need is some cardstock, dried leaves, and glue. After you laminate them (I took my bookmarks to Kinko's for that), you can opt to punch a hole at the top and string a ribbon through for added effect. The nice thing about laminating the bookmarks is that it preserves the leaves (intact) forever.

    1.25.2011

    Ikea Hack: Painted Wood Framed Mirror


    My son's due date was just on the outer edge of fall, so my nesting instinct kicked into high gear while the leaves were just starting to give way to breathtaking hues of red, yellow, and orange. I loved the fall so much that I decided to make fall colors the theme of my son's nursery, and I did, and I loved it, and I stuck with it for a while, until...I walked into a local gift shop one day which sold goods of a French/antique/repurposed persuasion, and I spotted a picture frame constructed out of small rectangular pieces of rotting wood that had washed up on a shore somewhere, with each wood piece lightly painted with some beautiful shade of sea glass and bearing holes where nails used to pierce it. I coveted that picture frame but alas, I couldn't justify the hefty price tag so I sadly left it at the store.

    Well, here, you see my budget version of that picture frame, and I happened to like it so much (and the lighthouse/sail boat bookends that I later found at Ross) that  it became an inspiration board of sorts  as my son's fall-themed nursery gave way to a nautical theme centered around the myriad colors of sea glass. 

    You will need:
    • Ikea Malma mirror, $2.99!
    • Small bottles of acrylic paint (whatever colors you choose)
    • One paintbrush
    • Painter's tape (or regular masking tape will do)
    • Black ink pen
    • Ruler (any sharp edge will do)
    • Mod Podge


    1. With a pencil and ruler, lightly draw out the rectangles directly onto the mirror. Space/stagger them however you wish.
    2. Using masking tape, tape around the edges of each rectangle as you paint so that you get clean, straight lines. Wait until the painted area is dry before proceeding on to the next rectangle.
    3. After you finish painting the entire mirror and it is completely dried, take your straight edge and black pen and outline each rectangle. Add tiny black circles within many of the rectangles for added effect (to mimic former nail holes)
    4. Once the pen ink has completely dried, use your paintbrush to paint on a layer of Mod Podge over the entire frame. After this first layer has dried, add a second coat. Add on coats as you see fit. 2-3 coats should suffice.
    5. Admire and display in your child's room/nursery!

    1.24.2011

    Anthropologizing Drool Catchers


    My sister is a die hard fan of Anthropologie. So much so that now whenever she goes there, I ask her what havoc she wreaked on her credit card, and whether she will have to go "anthropologize" to her husband. As a tribute to her love for all things Anthropologie, I decided to create some bibs for her daughter (currently en wombe) with embellishments that she could appreciate. I kept it simple, of course, because bibs are meant to catch bodily fluids after all.

    :: As a side note, bibs really do need to be aesthetically pleasing, even for boys. My son drools his body weight every day, so he is constantly bibbed. As much as I can't wait for a bibless day, it helps a lot to at least have something tasteful sopping from his neck.

    Felt Alphabet Letters


    My sister, bless her heart, suffered a thousand pinpricks creating this felt alphabet letter collection for my son in the hopes that it will make learning his ABCs more fun. As an added bonus, these aesthetically pleasing, visually arresting, and functional wool felt letters are portable, and large enough not to pose as choking hazards (a real plus for me since my son still suffers from the burning desire to shove anything and everything into his mouth).

    This project is pretty self explanatory, and I think the pictures speak for themselves. If you're a novice at sewing with a needle and thread though, just make sure you have a thimble because otherwise you will curse the fact that the English alphabet has a whopping 26 letters.

    Also, if you aren't comfortable with hand-drawing the letters, you can just type them out in a word document, blow them up as large as you want them to be, cut them out, and trace around the letters onto your felt.

    This project is definitely a labor of...

    Related Posts Plugin for WordPress, Blogger...