 |
| Animal Flashcards |
You've heard the cliched phrase, "children are sponges," right? Well, it's true. I am constantly underestimating my son's capacity for learning and comprehension, and he surprises me everyday. Unfortunately for him, teaching is not my forte. In fact, I rather detest it, but because I love my son and want him to grow up knowing certain things, like how to read, the names of animals, and how to say please and thank you, I do what I can. These days, I noticed he is into animals (particularly the ones in Goodnight Gorilla) so I decided to make him some flashcards so he could learn their names (or at the very least, stare at them and then toss them like ninja stars across the room, which he is prone to do).
**Disclaimer: There are a myriad ways to make flashcards, and a myriad programs you can use. The following tutorial just happens to describe the way I chose to do it, based on the tools and time I had at hand. If you know of a better program, or more efficient way, I'd love to hear it!
1. Find image files of your animals of choice and save them (I just ran Google searches like "pig images," or "lion images" and found scores of images)
2. Open up the website www.picnik.com, click on the button, "Get started now!," and then click on, "Upload a photo." Upload an image file.
3. Under the "Edit" tab, you will find many tools for correcting and enhancing your images.
4. Under the "Create" tab, there are additional editing features. I chose to round the corners of my images by clicking on the subheading "Frames" (circled in red below) and scrolling down on the left sidebar to "Rounded Edges." I also added the name of the animal by clicking on the subheading "Text," (circled in red below) choosing a font on the left sidebar, and typing the name into box at the top of the left sidebar, and clicking "Add." You can play around with the size and color of the text.
5. Save the edited image file.
**Disclaimer: You can probably use a number of different programs (including Microsoft Word) to accomplish the next steps, but this is just the way that I happened to do it.
6. Open up Microsoft Publisher. Under the "File" tab, click on "New." Select "Blank Page Sizes."
7. Scroll down, and select "Letter (Landscape)" or "Letter (Portrait)." It doesn't matter because depending on the orientation of some of your image files, you may have to rotate some images either way. Also, if you want to make bigger or smaller flashcards, you can also select your page size accordingly.
8. On the vertical toolbar (on the far left of the screen), click on the "Line" tool. I circled it in red below. Use it to draw a line splitting the blank page down the middle both vertically and horizontally. This will help you in keeping the flashcards uniform in size (one page = 4 different flashcards).
9. Click on "Insert" (find it on the horizontal toolbar at the top of the screen), and select "Duplicate Page." This will add an additional page just like the one you just created (with the page divided into four quadrants). This will save you the hassle of having to draw the lines repeatedly for each new blank page. Insert as many pages as you want depending on how many flashcards you intend to create.
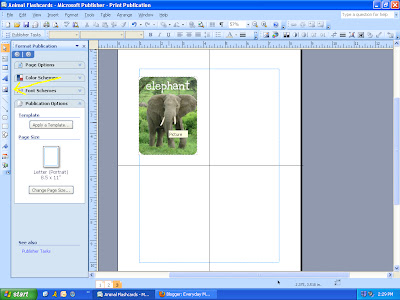
10. On the vertical toolbar on the far left of the screen, click on "Picture Frame" (a poorly drawn yellow arrow is pointing to it below), then select "Picture from file" from the scrolldown menu. Then click on the blank page where you want your image to appear, and you will be prompted to select the image file.
11. Drag the corners and sides of the image until it fits flush within the four sides of the particular quadrant you chose.
12. Repeat steps 9 and 10 for the remaining three quadrants until you have four flashcards.
13. Click on "Insert" (horizontal toolbar at the top of the screen), and select "Page." This will add an additional blank page for additional flashcards. Continue until you are finished making flashcards. Make sure to save the document as you work.
14. Print out the pages, cut out the flashcards, laminate, and cut out each laminated card. You're done!


3 comments:
Such a fun idea!
And thanks for stopping by my blog!
I'm your newest follower :)
Take care,
Michelle
You are very resourceful, I love your ideas!
PS - I nominated you for a Stylish Bloggy Award!
Stop on by to accept it!
http://lovingeverysecond.blogspot.com/2011/02/more-features-and-some-awards.html
Post a Comment